Creating Terms
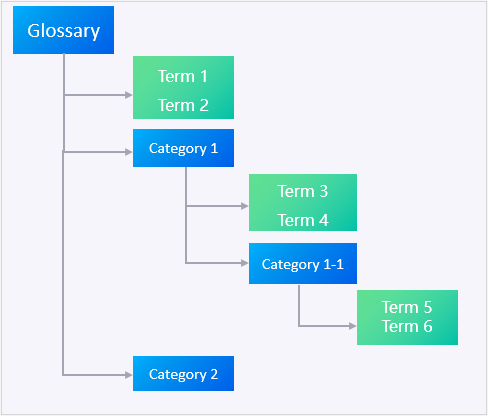
Data Catalog service organizes business terms through the Glossary-Category-Term relationship hierarchy to facilitate the search and management of terms.
Creating a Glossary
The glossary abstracts and summarizes technical terms related to data, allowing users to find and use the data more easily.
In the left navigation bar of the Data Catalog, click Business Terms.
On the top of the Business Terms function homepage, click New Glossary
 .
.In the pop-up window, enter the following:
Type:
If you tick
Custom, create a custom glossary:ID: enter the ID of the glossary, which should be unique in the current OU
Name: enter the glossary name
Description: enter the glossary description
If you tick
From System Library, you can add a glossary from the Data Catalog system termbase:Glossary Library: select a system glossary (the current version is only configured with the
Standard Metricglossary, which contains some standard industry terms in the wind power field.)ID: automatically generates an identifier for the selected system glossary
Name: automatically generates a name for the selected system glossary
Click OK to create the glossary.
After a new glossary is created, it will appear in the glossary list on the left side of the Business Terms function homepage.
Viewing Glossaries
After you select a glossary, you can view its name, ID, description, and other information about it under the Basic Information header, and you can view the terms contained in the glossary under the Term List header.
Editing Glossaries
Note
Editing is not supported for the system glossary.
In the glossary list on the left side of the Business Terms function homepage, select the glossaries you want to edit, right-click the mouse, and click Edit to bring up the Edit Glossary pop-up window.
On the Edit Glossary page, you can edit and modify the name and description of the glossary.
Click OK to complete glossary editing.
Deleting Glossaries
Note
If a term in the glossary is associated with an object, the glossary cannot be deleted. You need to cancel the term association before you can delete the glossary.
In the glossary list on the left side of the Business Terms function homepage, select the glossaries you want to edit, right-click the mouse, and click Delete to delete the glossary.
Creating Categories
On the top of the Tag Management function homepage, click New Category
 .
.In the pop-up window, enter the following:
Path: select a custom glossary in the drop-down as the glossary for the newly created category
Note
Creating categories is not supported for the system glossary.
ID: enter the ID of the category, which should be unique in the current OU
Name: enter the name of the category
Description: enter a category description
Click OK to create the category.
Note
Under a Category you can add further categories to enrich the context and organizational structure of the term.
Viewing Categories
After a new category is created, it will appear in the glossary under the left side of the Business Terms function homepage.
After you select a category, you can view the category’s name, ID, and description under the Basic Information header, and you can view the terms in the category under the Term List header.
Editing Categories
Note
Editing is not supported for categories under the system glossary.
In the glossary list on the left side of the Business Termsfunction homepage, select the categories you want to edit, right-click the mouse, and click Edit to bring up the Edit Category pop-up window.
On the tag editing page, you can edit the category name and description.
Click OK to complete category editing.
Deleting Categories
Note
Deletion is not supported for categories under the system glossary. If a term in the category is associated with an object, the category cannot be deleted. You need to cancel the term association before you can delete it.
In the glossary list on the left side of the Business Terms function homepage, select the categories you want to delete, then right-click the mouse and click Delete to delete them.
Creating Terms
On the top of the Tag Management function homepage, click nEW Term
 .
.In the pop-up window, enter the following:
Path: select the parent level of the new term in the drop-down
ID: enter the ID of the term, which should be unique in the current OU
Name: enter the name of the term
Description: enter the description of the term
Extra Attributes: enter an extra pair in the form of key-value to add attributes to the term.
Click OK to complete term creation.
Viewing Terms
After a new term is created, it will appear in the glossary list and under the category on the left side of the Business Terms function homepage.
Expand a glossary, select a category, and the glossary and terms under the category will appear under the Term List heading.
Click the plus icon
 in front of a specific term ID to expand the term information, including term name, description, tags, and additional attributes.
Click on a specific term ID to enter the term details page, where you can view the term details. For on term details, see Business Term Details.
Editing Terms
Note
Editing is not supported for terms in the system glossary.
On the Business Terms function page, select a glossary and category. Then, under the Term List header, click Edit
 at the end of the term lines you want to edit to make the Edit Term window pop up.
In the Edit Term window, you can edit and modify the term name, description, and attributes.
Click OK to complete term editing.
On the tag editing page, you can edit the category name and description.
Click OK to complete term editing.
Deleting Terms
Note
Deletion is not supported for terms in the system glossary. If a term is associated with an object, the term cannot be deleted. You need to cancel the term association before you can delete it.
On the Business Terms function page, select a glossary and category. Then, under the Term List header, click Delete
 at the end of the term lines you want to delete.
Click OK to delete the term.