Unit 1: Creating a Measurement Model
Step 1: Creating a Model
Log in to the EnOS Management Console and select Models from the left navigation bar.
Click New Model, and then in the New Model pop-up window, enter or select the following:
Identifier: enter
Test_SGBuildingModel Name: enter
Test_SGBuildingCreated From: tick
Np
Click OK to create the model.
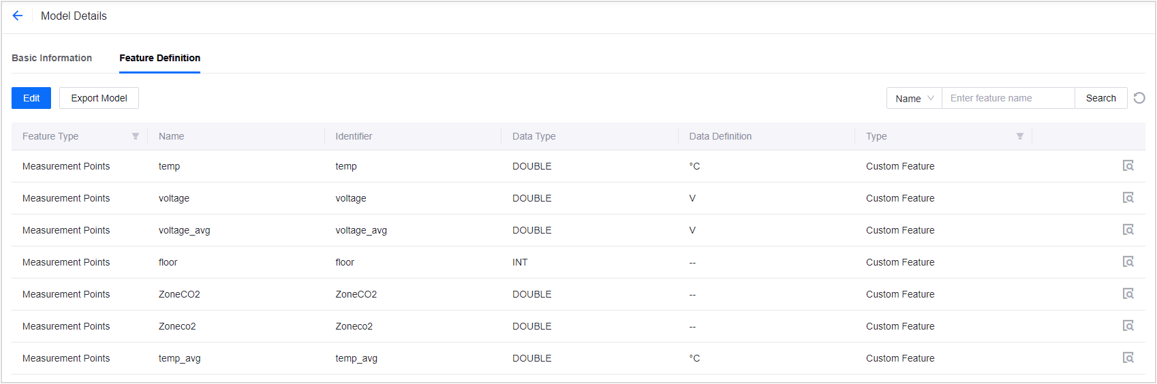
Step 2: Creating a Function Definition for the Model
At the end of the Test_SGBuilding model row, click View
 to go to the Model Details page.
Click the Feature Definition tab at the top of the page to go to the model function definition page.
Click Edit > Add > Create Custom Function.
In the Add Feature pop-up window, fill in or select information according to the following table, and create the following measurement points in sequence:
Feature Type |
Name |
Identifier |
Point Type |
Data Type |
Unit |
Quality Indicator |
|---|---|---|---|---|---|---|
Measurement Point |
temp |
temp |
AI |
double |
°C |
No |
Measurement Point |
voltage |
voltage |
AI |
double |
V |
No |
Measurement Point |
voltage_avg |
voltage_avg |
AI |
double |
V |
No |
Measurement Point |
floor |
floor |
DI |
int |
(Leave it blank) |
No |
Measurement Point |
ZoneCO2 |
ZoneCO2 |
AI |
double |
(Leave it blank) |
Yes |
Measurement Point |
Zoneco2 |
Zoneco2 |
AI |
double |
(Leave it blank) |
No |
Measurement Point |
temp_avg |
temp_avg |
AI |
double |
°C |
Yes |
Click OK to complete the model function definition.
Note
For more information about model creation, see Creating a Model.
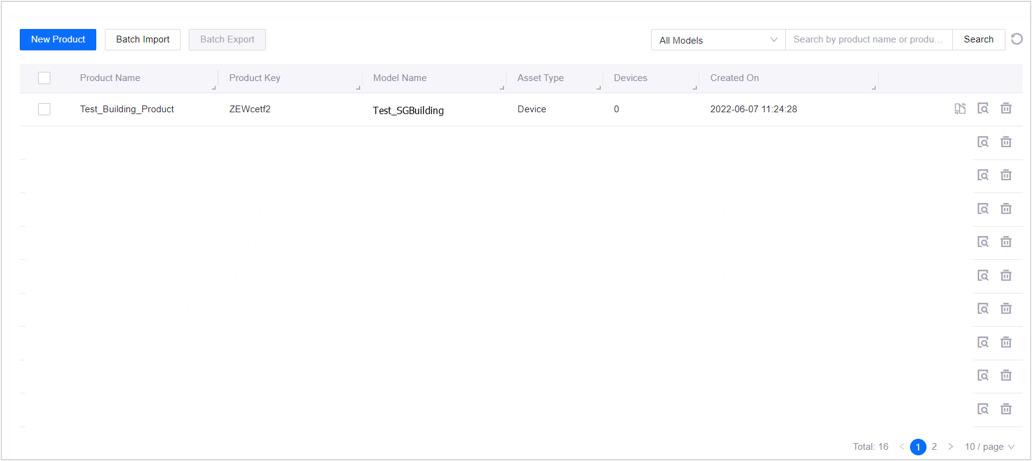
Step 3: Creating a Product Under a Model
Log in to the EnOS Management Console and select Device Management > Products.
Click New Product on the upper left of the homepage to make the New Product window pop up, and then enter or select the following:
Product Name: enter
Test_Building_ProductAsset Type: tick
DeviceModel: select
Test_SGBuildingAsset Method: select
Only EnOS IoTCertificate Mutual Authentication: select
Disabled
Click OK to create the product.
Note
For more information about product creation, see Creating a Device Collection (Product).
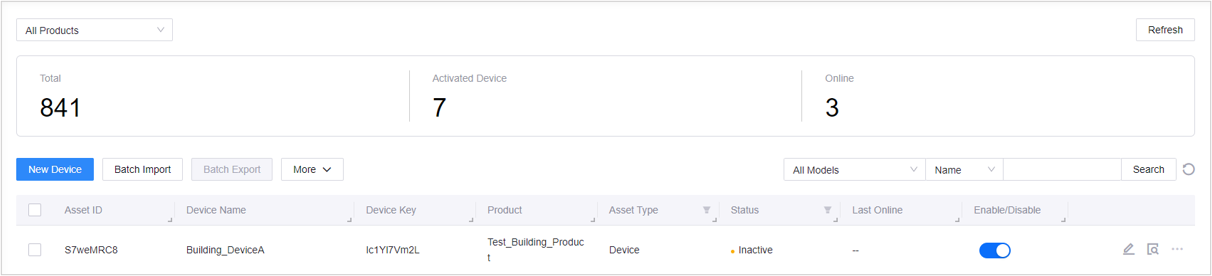
Step 4: Creating a Device Under a Product
Log in to the EnOS Management Console and select Device Management > Device Assets.
Click New Device on the upper left of the homepage to make the New Device window pop up, and then enter or select the following:
Product: select
Test_Building_ProductDevice Name: enter
Building_DeviceATime Zone/City: select
UTC + 08:00
Click OK to create the device
Note
For more information about product creation, see Registering a Device.
Once a device is created, it can be viewed in the device list, but the current device will be in the Inactive state. When you successfully connect the device to EnOS, the device status will change to Online or Offline and the device will be activated. For more about device connection, see Connecting and Managing Devices in the Cloud.
Step 5: Virtually Sending Device Asset Data
Adding a Device Virtualization
Log in to the EnOS Management Console and select Device Management > Simulators.
Click New Simulator on the upper left of the page and tick
Building_DeviceA.Click OK to create device simulator for
Building_DeviceA.
Defining Sample Data
At the end of the
Building_DeviceAdevice row, click Edit Sample to start defining sample data for the device.
Click Download to download sample data template.
Enter or modify the data information based on the format
Click Upload and select the local .xlsx file to upload.
Click OK to finish defining sample data.
Starting a Device Simulation
At the end of the
Building_DeviceAdevice row, click Start .
.Select the end time of the simulation in the Start Simulation pop-up window.
Click OK to start device simulation.
Note
For more information about device virtualization, see Device Simulator.
Step 6: Syncing Models
In the left navigation bar of the Data Catalog, click Synchronization Tasks.
Click New Task> System Synchronization Task.
In the System Synchronization Task pop-up window, select the following:
Synchronization Task Name: select Sync Points from DCM
Content to Sync: select
Test_SGBuilding
Click OK to create the system Synchronization Task.
In the data Synchronization Task list on the Synchronization Tasks feature homepage, at the end of the Synchronization Task Sync Points from DCM row, click Start
to start the synchronization tsk.
After model sync is complete, it can be viewed in the Data Catalog.
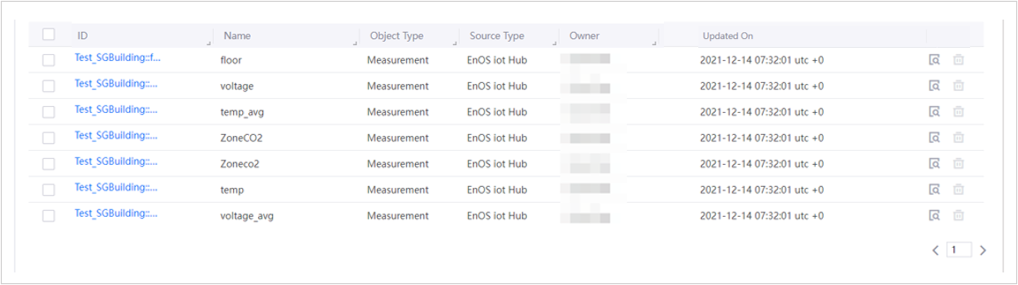
In the left navigation bar of the Data Catalog, click Data Asset Explorer.
On the right side of the Data Asset Explorer homepage, under the Metadata Object Statistics header, click the number in the brackets of a Measurement data type to go to the Data Asset Explorer homepage.
Enter keywords
Testin the search box and click the search icon to start a search.
View the synchronized model as shown in the figure below: