Tutorial: Integrating Historical Device Data from Third-party System to EnOS
You can use message integration to integrate historical and offline device data from a third-party system to EnOS.
This tutorial sets a message integration task in the following scenario:
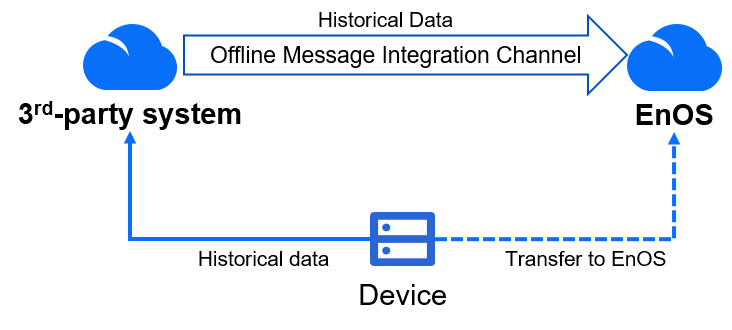
A device originally connected to a third-party system needs to be connected to EnOS, where the historical data residing in the third-party system will also be transferred to EnOS.

About This Task
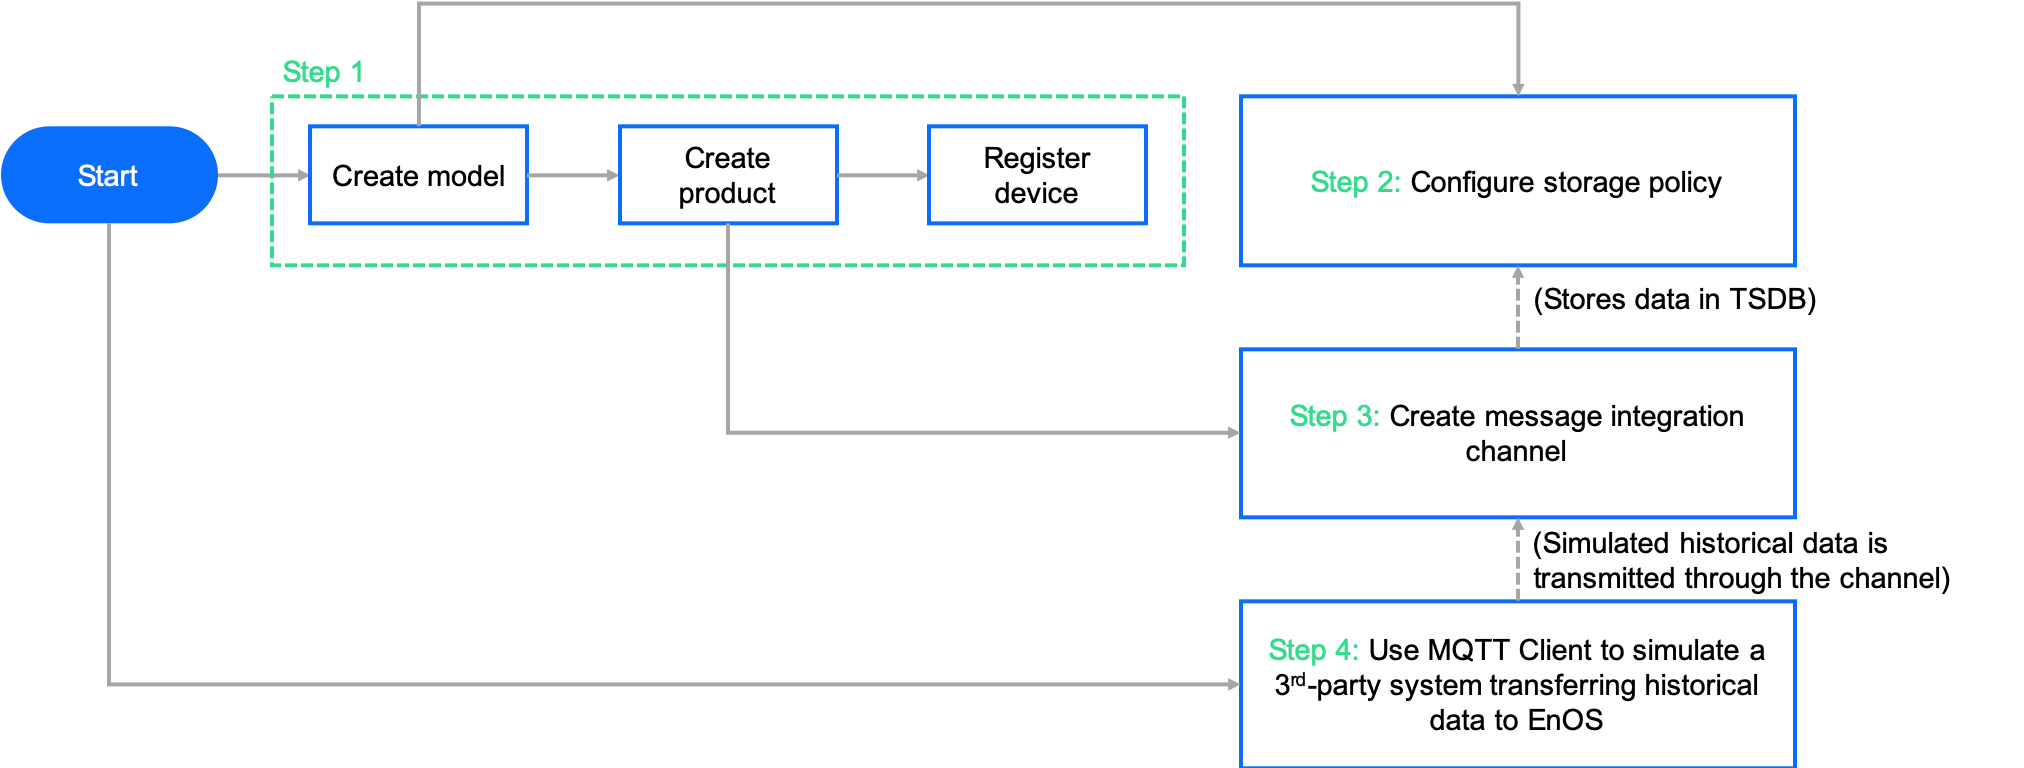
The steps we will follow are as follows:

The numbers in the diagram indicates the order in which we will perform the steps, while the arrows with solid line indicates the dependency between steps, such as:
You must create a model before you can configure storage policy.
You must register a product before you can create a message integration channel.
On condition that you respect the dependencies, you can arrange how you perform the steps as you see fit.
The arrows with dashed lines indicate data flowing from the simulated third-party system through the message integration channel to the TSDB in EnOS.
Before You Start
Contact your OU administrator for access to the following function modules if you do not have them. For more information, see Policies, Roles and Permissions.
Model
Device
Time Series Data
Install the Java Development Kit on your local device.
Procedure
Step 1: Create Model, Product, and Register Device
Create a model for the simulated ammeter with the following parameters. For information on how to create a model, see Creating a Model.
Model for Simulated Ammeter¶ Field
Value
Identifier
test.ammeter
Model Name
Simulated Ammeter Model
Category
None
Created From
No
Source Model
No
Description
None
Define the following elements for the model we just created.
Elements of Simulated Ammeter¶ Field
Value
Feature Type
Measurement Points
Name
Real-time Current
Identifier
current
Point Type
AI
Data Type
double
Unit
Electric Current: milliampere
Quality Indicator
No
Tags
None
Description
None
Create a product based on Simulated Ammeter Model with the following parameters. For information on how to create a product, see Creating a Device Collection (Product).
Simulated Ammeter Product¶ Field
Value
Product Name
Simulated Ammeter Product
Asset Type
Device
Model
Simulated Ammeter Model
Data Type
Json
Certificate-based Authentication
Disabled
Description
None
Register a device based on Simulated Ammeter Product with the following parameters. For information on how to create a device, see Creating a Device.
Simulated Ammeter Device¶ Field
Value
Product
Simulated Ammeter Product
Device Key
simulatedAmmeter
Device Name
Simulated Ammeter Device
Time Zone/City
UTC+08:00
Step 2: Configure TSDB Stroage Policy
In Time Series Data Management > Storage Policy, configure the storage policy for the simulated ammeter.
Select an existing group or create a new group. If you select an existing group, click Edit Group. If you create a new group, give a name for the group.
Select test.ammeter for the Group Model and click OK to include the ammeter model into the policy group.
Click
 beside AI Raw Data. Select a storage time from the drop-down list, and select test.ammeter to include all its measurement points into this policy.
As this tutorial does not require normalized data, Real-time Current is put in AI Raw Data.
Step 3: Create Message Integration Channel
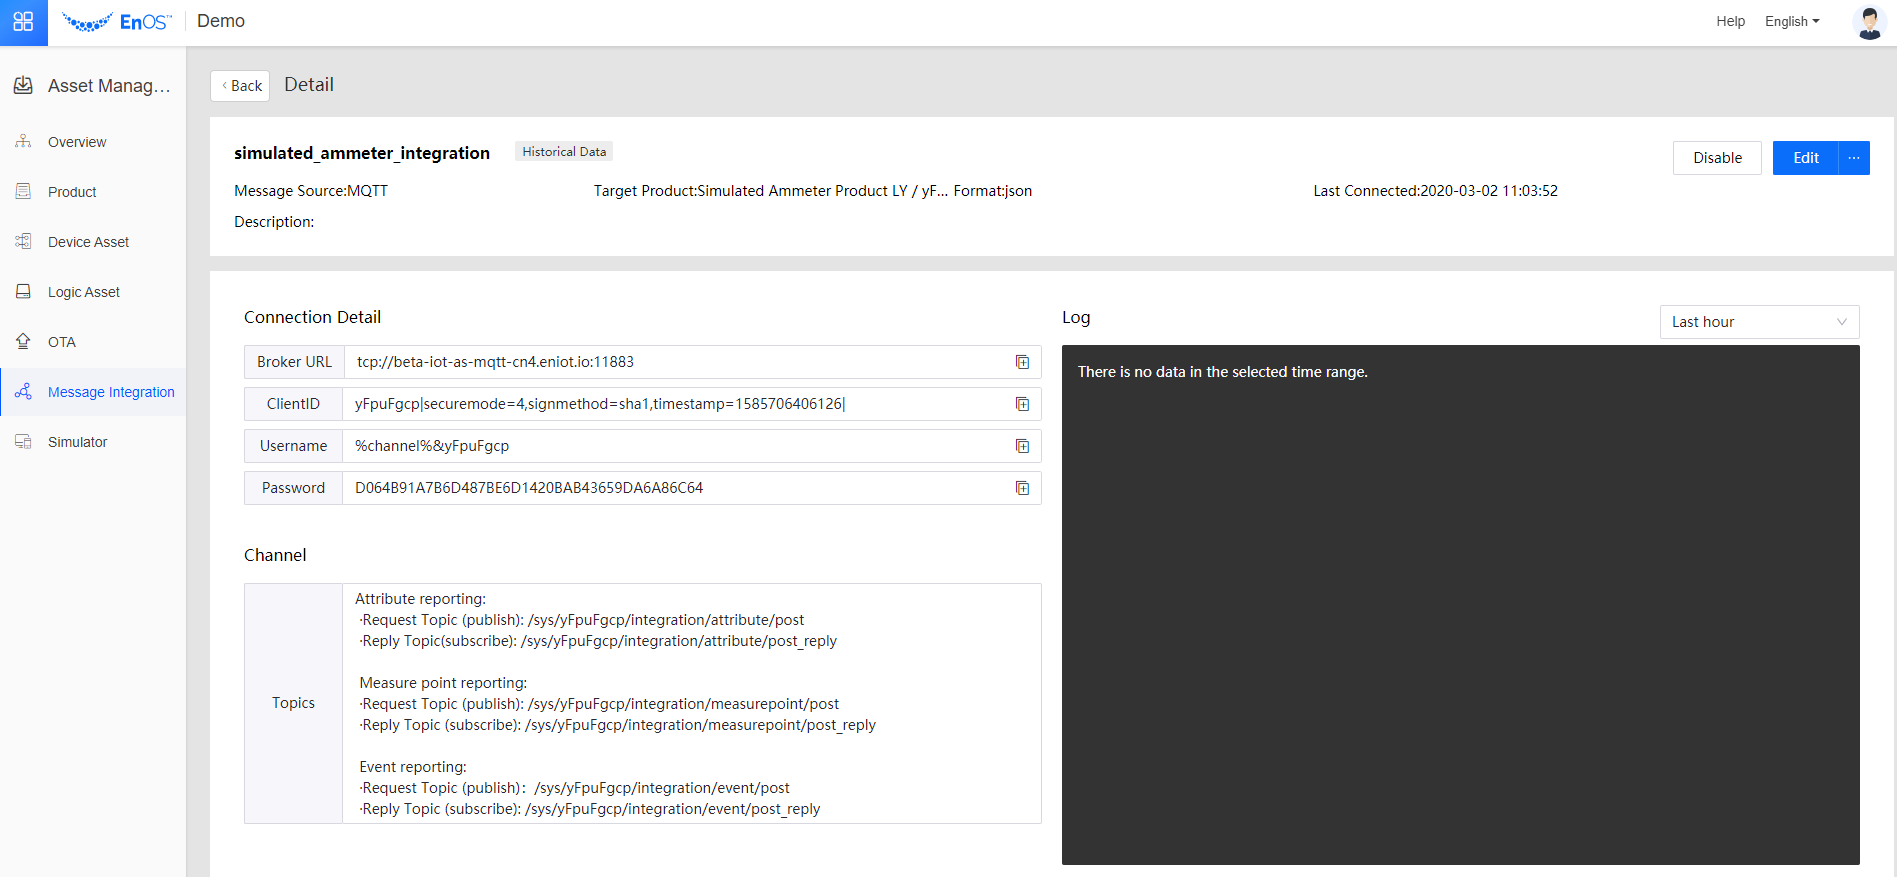
In Asset Management > Message Integration , create a message integration channel for the Simulated Ammeter Device. For more information on how to create a channel, see Integrating Device Data from Offline Channel.
Step 4: Use MQTT Client to Simulate the Thrid-party System
Copy the following code snippet into your IDE and replace the parameter values as the comments and explanation below suggests. Then run the code snippet.
import org.eclipse.paho.client.mqttv3.*; //Use Eclipse Paho MQTT client to simulate a 3rd-party system

public class IntegrationSample {

  public static String brokerURL = "tcp://tcp-address:port"; //Click View Details to view Broker URL
  public static String clientId = "id12345|securemode=4,signmethod=sha1,timestamp=6355824601597|"; //Click View Details to view Client ID
  public static String userName = "%channel%&12345"; //Click View Details to view Username
  public static String password = "7C4095981435F3ABCD4E6CFFF8F7E27F26975505"; //Click View Details to view Password
  public static MqttClient sampleClient=null;


  public static void postPoint(int i) throws MqttException { //This function create a JSON string to be sent
    String topic = "/sys/O0DUTcD8/integration/measurepoint/post"; //The MQTT topic used to send measurement point data. Click View Details to view all the topics.
    long currTs=1570024800000L+10*i; //A timestamp of some time in the past. The incremental variable i is added so that the parameter represents a time segment. This time stamp must be rounded up to millisecond, i.e. , must be a 13-digit long integer.
    double value=28.01+0.1*i; //Measurement point data

    String content="{\n" +
            "    \"id\":\""+currTs+"\",\n" +
            "    \"version\":\"1.0\",\n" +
            "    \"method\":\"integration.measurepoint.post\",\n" +
            "    \"params\":[\n" +
            "        {\n" +
            "            \"deviceKey\":\"simulatedAmmeter\",\n" +
            "            \"time\":"+currTs+",\n" +
            "            \"measurepoints\":{\n" +
            "                \"current\":"+ value +" \n" +
            "            }\n" +
            "        }\n" +
            "    ]\n" +
            "}";
    //This parameter creates a request, whose structure and parameter definition are at https://www.envisioniot.com/docs/device-connection/en/2.1.0/reference/mqtt_offline/report_offline_points.html

    MqttMessage message = new MqttMessage(content.getBytes());
    message.setQos(1);


    sampleClient.publish(topic, message); //Publishes message
    }

  public static void main(String[] args) throws  MqttException {
    sampleClient = new MqttClient(brokerURL, clientId); //Creates an MQTT client
    MqttConnectOptions connOpts = new MqttConnectOptions();
    connOpts.setCleanSession(false);
    connOpts.setUserName(userName);
    connOpts.setPassword(password.toCharArray());
    //Connects to EnOS
    sampleClient.connect(connOpts);


    for(int i=0;i<1000;i++ ){ //Transmits data 1000 times
    postPoint(i);
    }


    sampleClient.disconnect(); //Disconnects from EnOS
    sampleClient.close();
  }
}
The parameters in the preceding snippet can be found by clicking View Details on the message integration channel you created in step 3.
brokerURLclientIduserNamepasswordtopic

Results
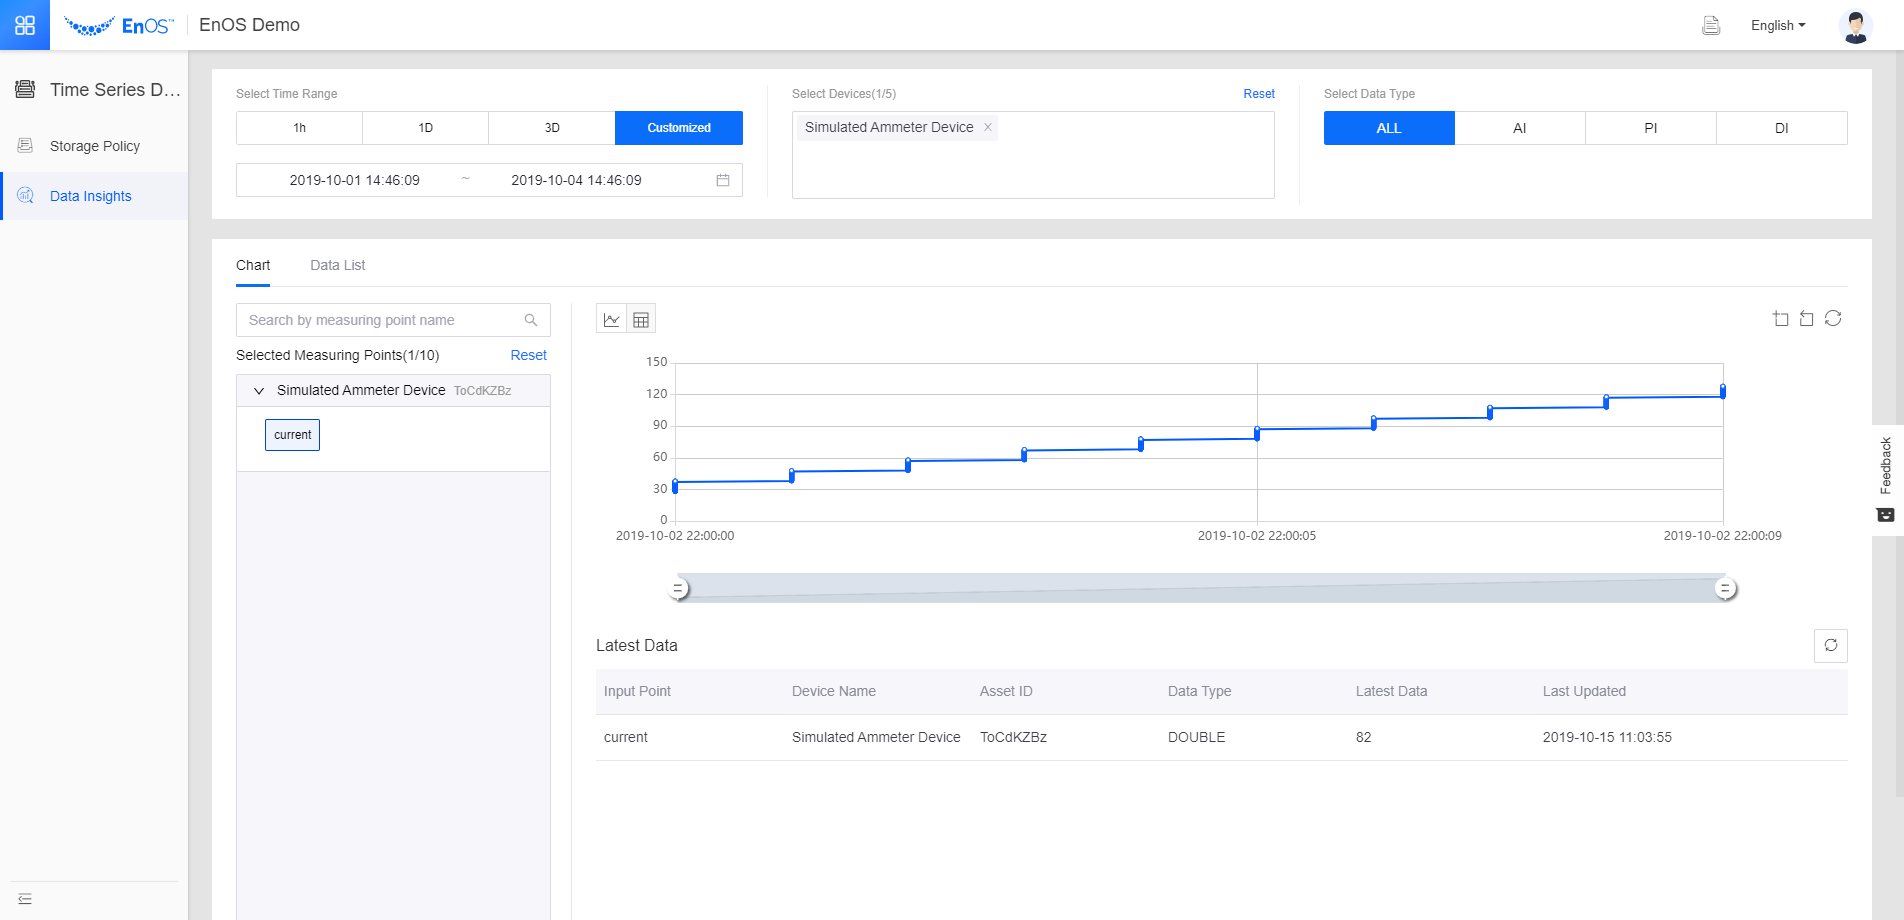
After some time, go to Time Series Data Management > Data Insights . Select Simulated Ammeter Product for product and current for measurement point. Set the time of query to the time you set in the snippet by currTs. You can see that the historical data of that time is already stored in the TSDB.
