Unit 2: Building the Routing Rule
A routing rule is made up of a series of rule nodes that process the incoming messages from devices.
Step 1: Creating A Rule
Log in to EnOS Management Console and click Routing Rule from the left navigation menu.
Click New Routing Rule.
Enter the rule name Temp Sensor Rule and description, and click OK.
Step 2: Designing the Rule
You will enter a design canvas page with the Rule Entry node.
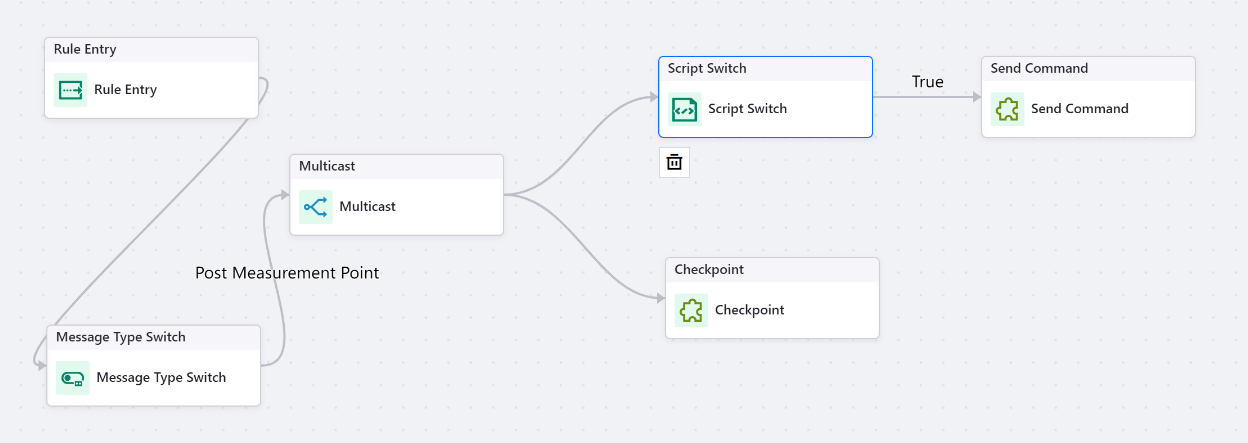
Design and connect the rule with the following nodes in the order shown below.

Rule Entry Node
Every routing rule must start with the Rule Entry node.
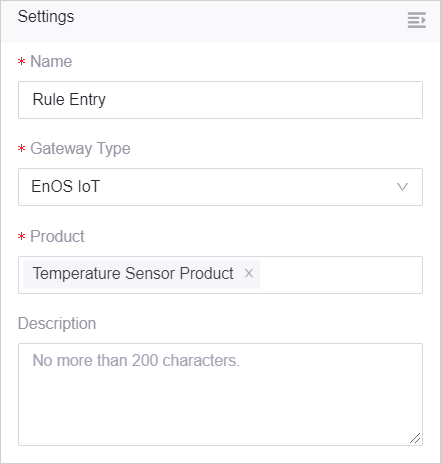
Click the Rule Entry node.
Select EnOS IoT from the Gateway Type drop-down.
Select Temperature Sensor Product from Product so that all incoming data from devices under this product will come to this rule to be processed.

For more information, see the Rule Entry node.
Message Type Switch Node
The Message Type Switch node routes the incoming message when the devices under the Temperature Sensor Product post their measurement points.
Click the Message Type Switch node.
Select Post Measurement Point from the Message Type drop-down.

For more information, see the Message Type Switch node.
Multicast Node
The Multicast node forwards the input to multiple nodes to be processed in different ways. In this tutorial, the input is processed in 2 ways: sends a command to the air-con device if the temperature is higher than 30, and routes the rule to the EnOS_default rule which will send the measurement points to a Kafka topic and save the measurement points posted to EnOS.
For more information, see the Multicast node.
Script Switch Node
The Script Switch node routes the output from the Multicast node according to the results of the written JavaScript. In this tutorial, the script checks that the temperature value from the input is a number and if the value is higher than 30, will route to the next node.
Click the Script Switch node.
Click the Script tab and enter the script as per the below.
if (typeof msg.temperature === 'number') {
  return msg.temperature > 30;
} else {
  throw new Error('Temperature type unsupported');
}

For more information, see the Script Switch node.
Send Command Node
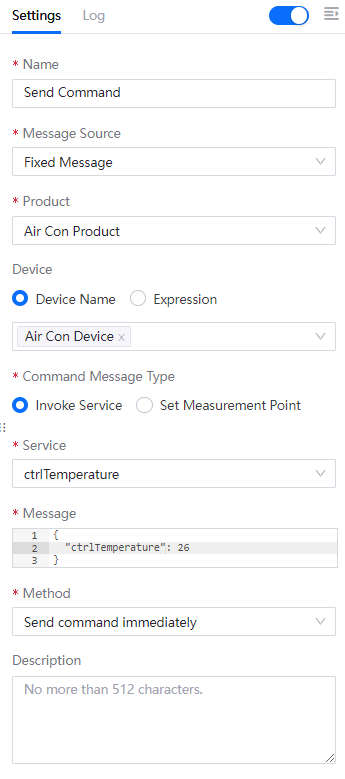
The Send Command node sends a command to the Air Con Device to adjust the temperature to 26.
Click the Send Command node.
Select Mixed Message from the Message Source drop-down.
Select Air Con Product from the Product drop-down, select Device Name for Device, and select Air Con Device.
Select Invoke Service for Command Message Type.
Select ctrlTemperature from the Service drop-down, and enter the following for Message.
{
 "ctrlTemperature": 26
}
Select Send command immediately from the Method drop-down.

For more information, see the Send Command node.
Checkpoint Node
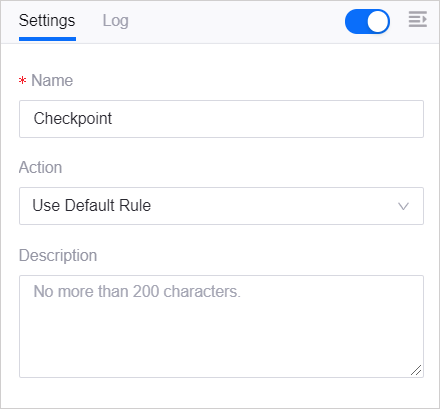
The Checkpoint node routes the rule to the EnOS_default rule.
Click the Checkpoint node.
Select Use Default Rule from the Action drop-down.

For more information, see the Checkpoint node.