Creating Pipelines
This section shows how the application developer can create pipelines and configure the pipeline stages and jobs for applications.
Prerequisites
Before creating a pipeline, you need to complete the application creation and the basic information configuration. For the detailed steps, see Creating an Application.
Creating a Pipeline
In the project list, click a project name to enter the project space.
In the left navigation bar, select Development > Pipeline.
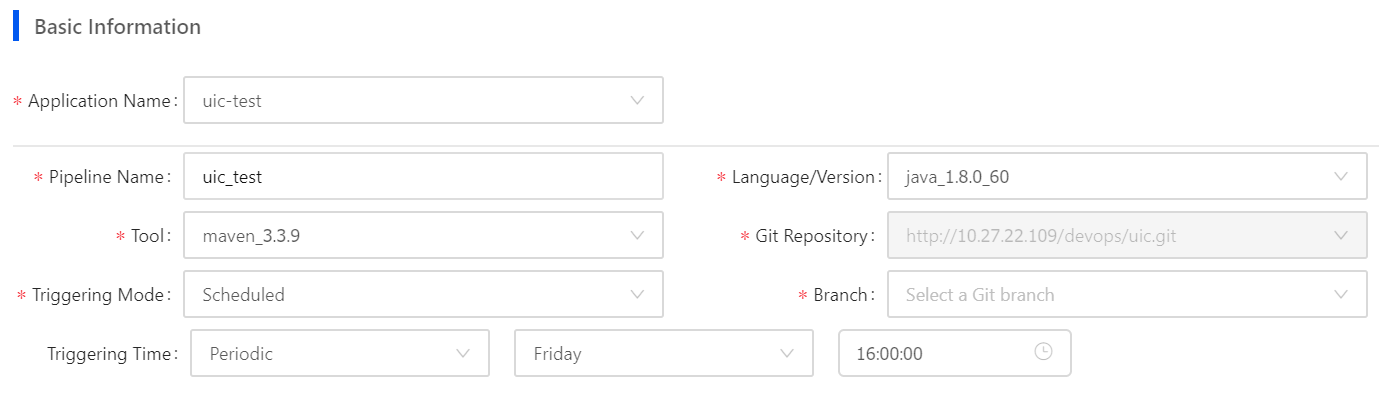
Click New Pipeline and enter the basic configuration information in the Basic Information section.
Application Name: Select an application from the created applications list.
Pipline Name: Enter the name of the pipeline.
Language/Version: Select the language and version for developing the application.
Tool: Select the dependency for the language. For example, if Java is chosen for Language/Version, select Maven for Tool.
Git Repository: This field is automatically populated with the repository of the selected application.
Triggering Mode: Select the way to trigger the pipeline to run.
Automatic: Run the pipeline when the specified GitLab repository branch changes.
Manual: Manually select the GitLab repository branch and run the pipeline.
Scheduled: Run the pipeline at the set time.
Branch: Select the GitLab repository branch that runs the pipeline when the Triggering Mode is set to Automatic or Scheduled.
Triggering Time: Select the specific time to run the pipeline when the Triggering Mode is set to Scheduled.
After completing the basic information configuration, go on to the Stage section to configure the stages and jobs of the pipeline.
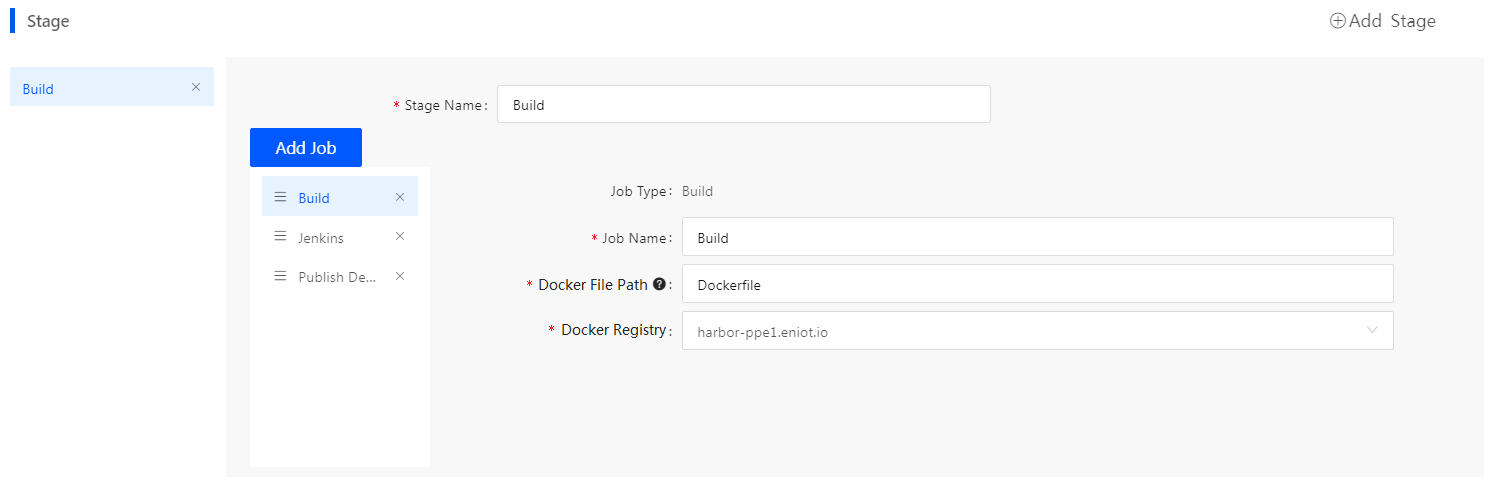
Configuring the Stages and Jobs
Enter the name for the stage at Stage Name.
Click the Add Job button, select the job type, and enter the required parameters.
Job Type: Build
Job Name: Enter the name of the build job.
Docker File Path: Enter the Dockerfile storage path, such as docker/Dockerfile, which is the project root path by default.
Docker Registry: Select the docker image repository.
Build Parameters: Enter the parameters for Maven.
Note
The build job will check if build.sh exists. If yes, it will automatically execute build.sh. If not, it will determine whether pom.xml exists, and if it exists, the mvn Clean package -U -DskipTests command will be executed. When building with the custom build.sh, you need to set the storage location for the build results, such as war/tar/jar/zip packages, to the target directory under the project root directory.
Job Type: Deploy
Job Name: Enter the name of the deployment task.
Cluster: Select the cluster where the application will be deployed.
Resource Type: Select the resource type for the deploy job, where you can select Deployment or StatefulSet.
Resource Name: Select the deployment configuration name of the application. See Configuring Deployments for more information.
Job Type: Scan
Job Name: Enter the name of the code scanning job.
Source Code: Enter the path to the file to be scanned, such as src/main/java, src/main/java/utils/Test.java, etc.
Exclusion Files: Enter file paths that do not need to be scanned, such as src/main/java/, src/main/java/*/, src/main/java/utils/Test.java, etc.
Unit Test: Select whether to perform the unit test. If yes, enter the path of the test file, such as src/test.
Note
The code scanning job will check if build.sh exists. If yes, it will automatically execute build.sh. If not, it will determine whether pom.xml exists, and if it exists, the mvn clean compile -DskipTests command will be executed. When Java is used as the programming language, it will check whether there is a sonar-project.properties file. If yes, sonar-scanner will be used to complete the code scanning, and if not, mvn sonar:sonar will be used. As for other programming languages such as Node.js, sonar-scanner will be used for code scanning by default.
Job Type: Publish Dependency
Job Name: Enter the job name.
Build Path: Enter the path where the pom file is located, such as share, which is the project root path by default.
Parameters: For Java, the default command is mvn deploy, and you can add parameters like -DskipTests. For npm, the default command is npm publish, and you can add parameters like –access=public.
Job Type: Jenkins Job
Job Name: Enter the name of the Jenkins job.
Jenkins URL: Enter the Jenkins service address, e.g.: http://jenkins-ci.envisioncn.com:8080/jenkins.
Job Name: Enter the Jenkins job name.
Parameters: Enter the required Jenkins parameters.
Job Type: Custom Job
Job Name: Enter the name of the custom job.
Shell Script Path: Enter the path of the script file that you want to run.
Click and drag the jobs to sort the jobs’ running order.
After the job configuration for the stage is completed, click Add Stage and repeat the steps above to add the second stage of the pipeline.
After the stage configuration is completed, click the New Pipeline button to save the pipeline configuration.
Next Step
Once the pipeline is created, you can run the pipeline and view the status and results of the running pipeline.