Managing Custom Page Configuration
Alarm Management supports configuring custom pages in the alarm details of Active Alarm and Alarm Log. A custom page can be of the Alarm Log, Causes, Monitoring, or Alarm Jump type. A configured Alarm Log, Causes, or Monitoring page displays the related data as a tab in the alarm details, while a configured Alarm Jump is displayed as an icon in the action area at the top of the alarm details that match the response range. You can select the icon to open the specified address.
Prerequisites
Before starting, make sure the current account has been assigned the menu group containing Alarm Config. If not assigned, contact the OU administrator.
Creating a Custom Page
Select Alarm Config in the left navigation bar to access the Custom Page Configuration tab.
Select New and enter the following information in Basic Information:
Configuration Name: Enter the name of the page configuration.
Custom Type: Select Alarm Log, Causes, Monitoring, or Alarm Jump.
Configure the following information based on the selected Custom Type:
If Alarm Log, Causes, or Monitoring is selected, enter the following information in Page Settings:
Custom Field: Select Add Field, enter the custom fields displayed on the page in Field Name, and enter the related fields of the interface in Mapping Field.
List Field: Select Add Field, enter the fixed fields displayed in the form in Field Name, and enter the related fields of the interface in Mapping Field.
URL: Enter the URL of the information displayed on the Causes or Monitoring page.
Note
Custom Field and List Field are currently only available for the Alarm Log page.
If Alarm Jump is selected, configure Response Range and Jump Setting:
Response Range: Controls which alarms display the configured jump operation. Select an Alarm Group, and then select Alarm Severity and Alarm Type. In Valid Scope, select All Assets or Designated Assets. Defaults to All Assets.
Jump Setting: Configures the display name, opening method, and address of the jump operation. In Jump Operation, configure Jump Operation Name, Jump Method, and Jump Address. Jump Method supports Open in a New Page and Open in the Current Page. In Jump Address, you can use
${key}placeholders to reference alarm parameters. When a user initiates the jump, Alarm Management replaces each placeholder with the actual parameter value from the current alarm record, so that a different jump address is generated for each alarm. For the supported parameters and replacement rules, see Alarm Jump URL Parameters.
Select Save to complete the custom page configuration.
After the configuration is complete, each custom type is displayed in the alarm details as follows:
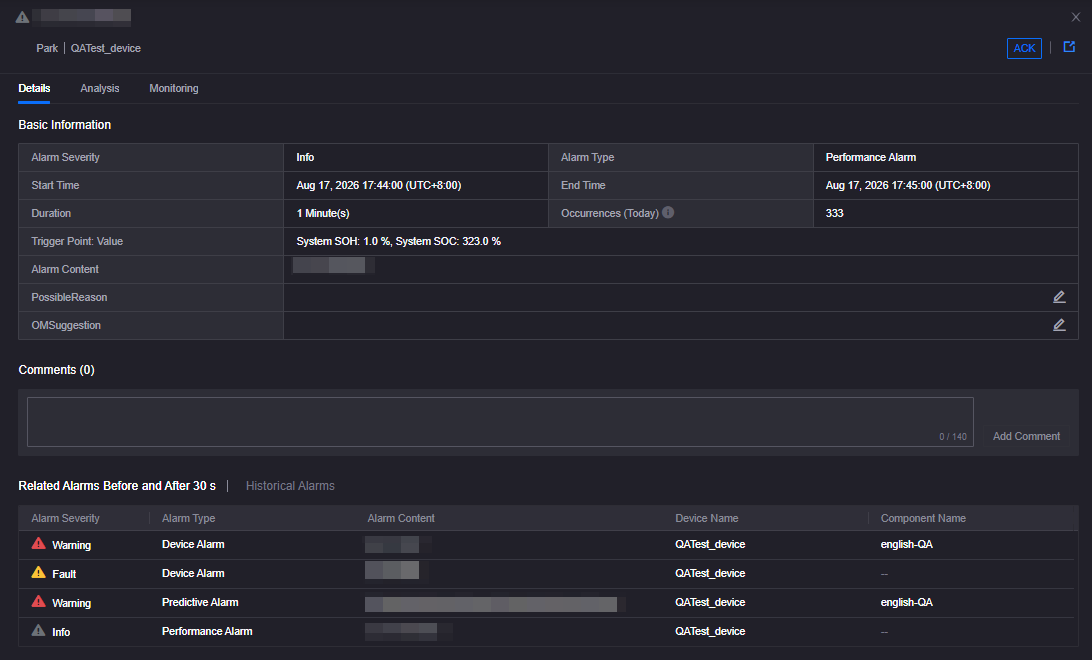
Alarm Log, Causes, and Monitoring: Displayed as tabs in the tab bar of the alarm details, after the built-in tabs (such as the Monitoring tab in the figure above). The Alarm Log tab displays the fields configured in Page Settings, and the Causes and Monitoring tabs display the information corresponding to the configured URL.
Alarm Jump: Displayed as an icon in the action area at the top right of the alarm details (such as the icon next to the Acknowledge button in the figure above), and only in the alarm details that match the response range. Select the icon to open the jump address in the configured way.
Editing a Custom Page Configuration
Select Alarm Config in the left navigation bar and select the Custom Page Configuration tab.
Select Edit in the corresponding page configuration row.
Deleting a Custom Page Configuration
Select Alarm Config in the left navigation bar and select the Custom Page Configuration tab.
Select Delete in the corresponding page configuration row. The page configuration cannot be restored once deleted.