Configuring Datasets
A dataset is a collection of data of the same type of data structure in a data source. By configuring a dataset, you can:
Customize the request parameters and return fields of the data, supporting widget reuse.
Simplify widget configuration and improve query precision through combined parameters and calculated fields.
Manage data structures in a unified way to improve maintenance efficiency.
Note
For data sources without a default structure (such as Static Data), a dataset is required. For data sources with a default structure, creating a dataset can override the default configuration to achieve more flexible data processing.
This document describes how to configure and use datasets for application developers.
Prerequisites
Before you start, ensure that:
An available data source has been created.
The data requirements of the business scenario are clear, such as the required fields and query conditions.
Process Overview
The overall process of configuring a dataset is as follows:

Create a dataset: Create a dataset for a data source and fill in the basic information.
Configure request parameters (optional): Define query conditions. This step can be skipped for Static Data Source.
Configure return fields: Select or adjust the return fields.
Debug and verify: Simulate a widget request and preview the returned results.
Use the dataset: After verification, use the dataset in page widgets.
Step 1: Create a Dataset
In DTV, go to DTV Center > Data Sources.
Select the Dataset corresponding to the data source to enter the dataset management page.
Select New Dataset, and configure the following content on the page according to the data source type:
Type |
Configuration Content |
|---|---|
Static Data Source |
Enter the Dataset Name. Select Download Template on the right, enter the static data in the CSV template file, and then select Import to upload the file. |
Other data sources |
Enter the Dataset Name and specify the Model associated with the dataset. |
Step 2: (Optional) Configure Request Parameters
ing
Request parameters are used to define data query conditions and are determined by the data source. If there are too many original parameters, or they do not meet your needs, you can optimize them by filtering or combining the original request parameters.
Note
Static Data Source does not require request parameters to be configured.
By default, all original parameters are selected. You can:
Adjust selected parameters: Narrow the range of selected parameters or modify their names and descriptions.
Add combined parameters: Combine multiple parameters into a single condition with a clear business meaning.

Adjust Selected Parameters
On the Request Parameters tab of the dataset edit page, all original parameters are selected in the Optional Parameters by default.
To reduce redundancy, you can deselect the parameters you do not need in the Optional Parameters list.
To customize the display name and description of a parameter, you can select the Edit
 button corresponding to the parameter and configure the following content:
Display Name: The parameter name displayed on the widget configuration page. Internationalization is supported.
Default Value: The default value used when the parameter is not specified.
Description: The parameter description displayed on the widget configuration page, used to provide help when configuring the parameter. Internationalization is supported.
Add Combined Parameters
Combined parameters are suitable for scenarios where multiple parameter values need to be combined into a single query condition, avoiding multiple selections and simplifying user operations. For example:
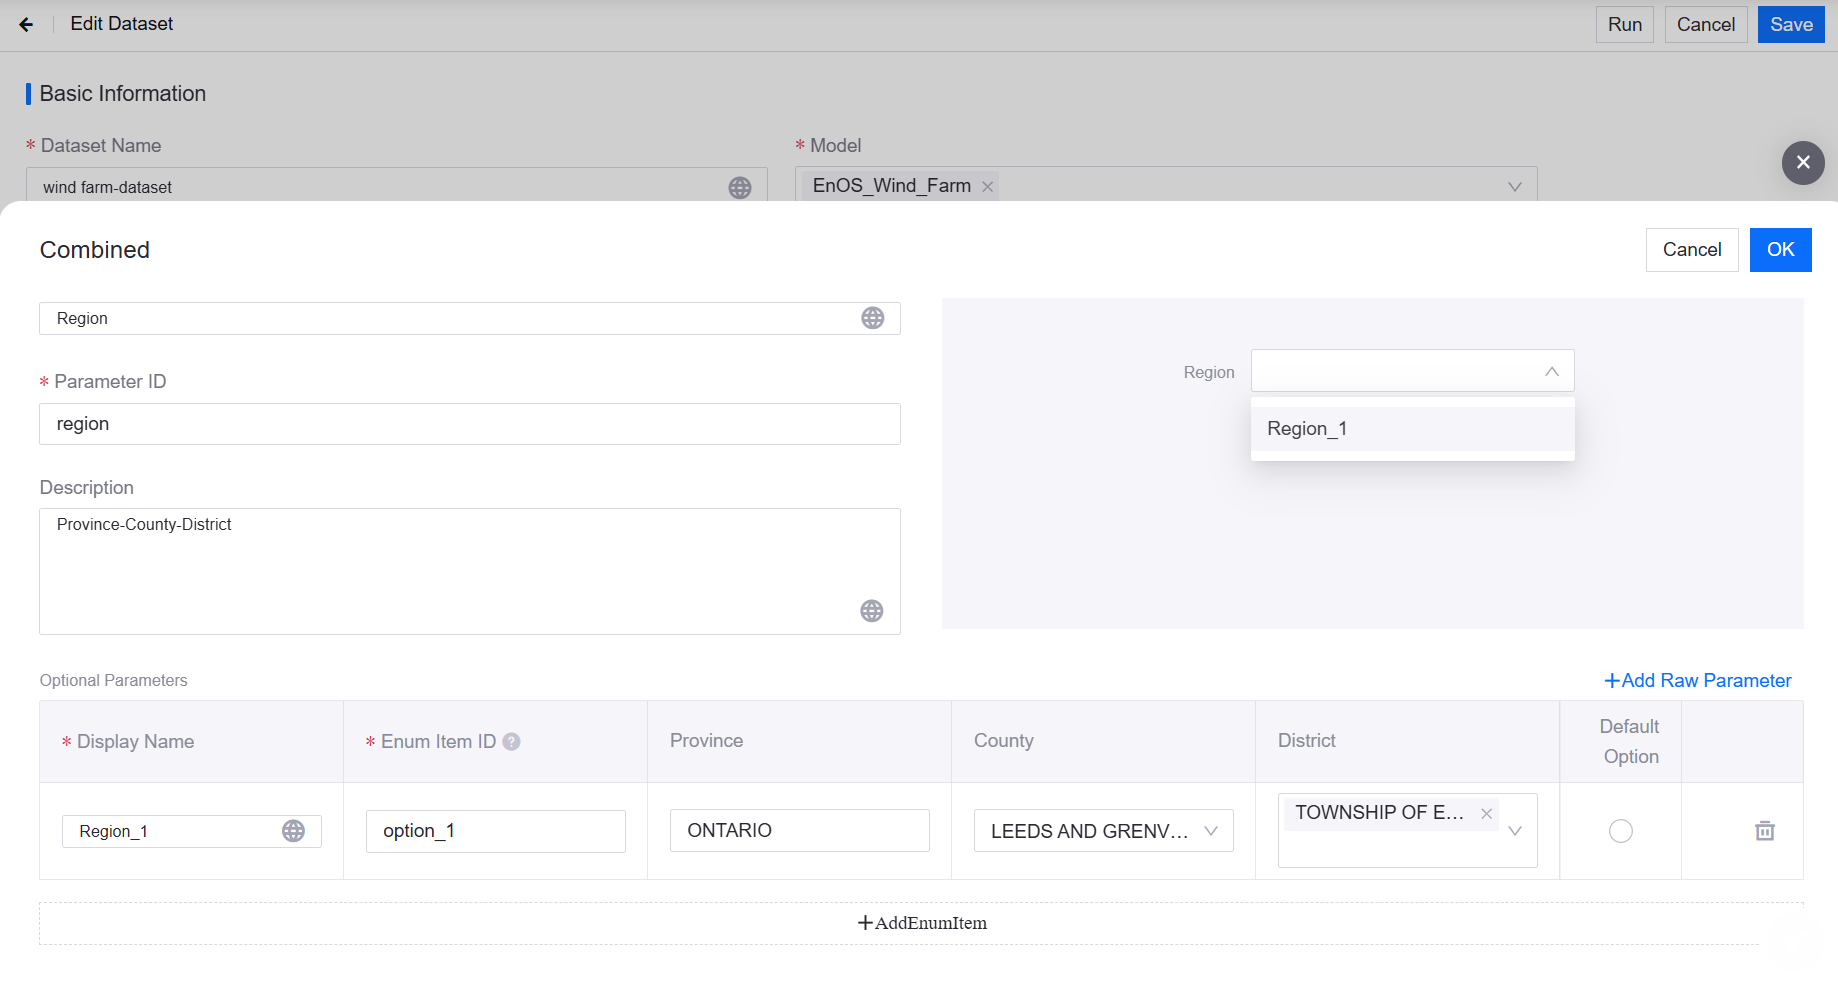
Suppose your data source contains 3 original parameters: province, county, and district. The business requirement is that users only need to select one “region” parameter in the widget, instead of selecting province, county, and district separately. You can add a combined parameter Region and configure the values of the province, county, and district parameters for each enumeration item. Users only need to select “region” in the widget, and the system will automatically pass the corresponding province, county, and district parameter values to the data source.
Note
Once an original parameter is referenced by a combined parameter, that parameter can no longer be configured or used separately as an original parameter. If existing page widgets directly reference the original parameter, these references may become invalid after the combined parameter is created, and the parameters need to be updated manually.
The procedure is as follows:
On the Request Parameters tab of the dataset edit page, select Add Combined Parameter.
In the pop-up window, define the basic information of the combined parameter:
Display Name: The parameter name displayed on the widget configuration page. Internationalization is supported.
Parameter ID: The unique identifier of the parameter, which is unique within the current dataset.
Description: Describes the purpose of the combined parameter.
Select Add Enum Item at the bottom to add an enumeration item to the combined parameter, and configure the Display Name, Enum Item ID, and define if it is a default option.
To configure the values of the original parameters for an enumeration item, you can select Add Raw Parameter on the right and configure the parameter values in the table. When a user selects an enumeration item in the combined parameter, it represents a request for the combination of multiple original parameter values.
Step 3: Configure Return Fields
Return fields define the fields output by the dataset and determine the range of data that the widget can display. When configuring return fields, you can choose:
Method 1: Use the default structure: Filter or extend based on the fields provided by the data source.
Method 2: Customize the structure: Fully customize the output structure to flexibly meet business needs.
Method 1: Use the Default Structure
The default structure is the collection of original return fields of the data source. Similar to the way request parameters are handled, you can:
Filter original fields: Keep only the fields you need to reduce redundancy.
Add calculated fields: Generate new fields based on original fields through JavaScript scripts.
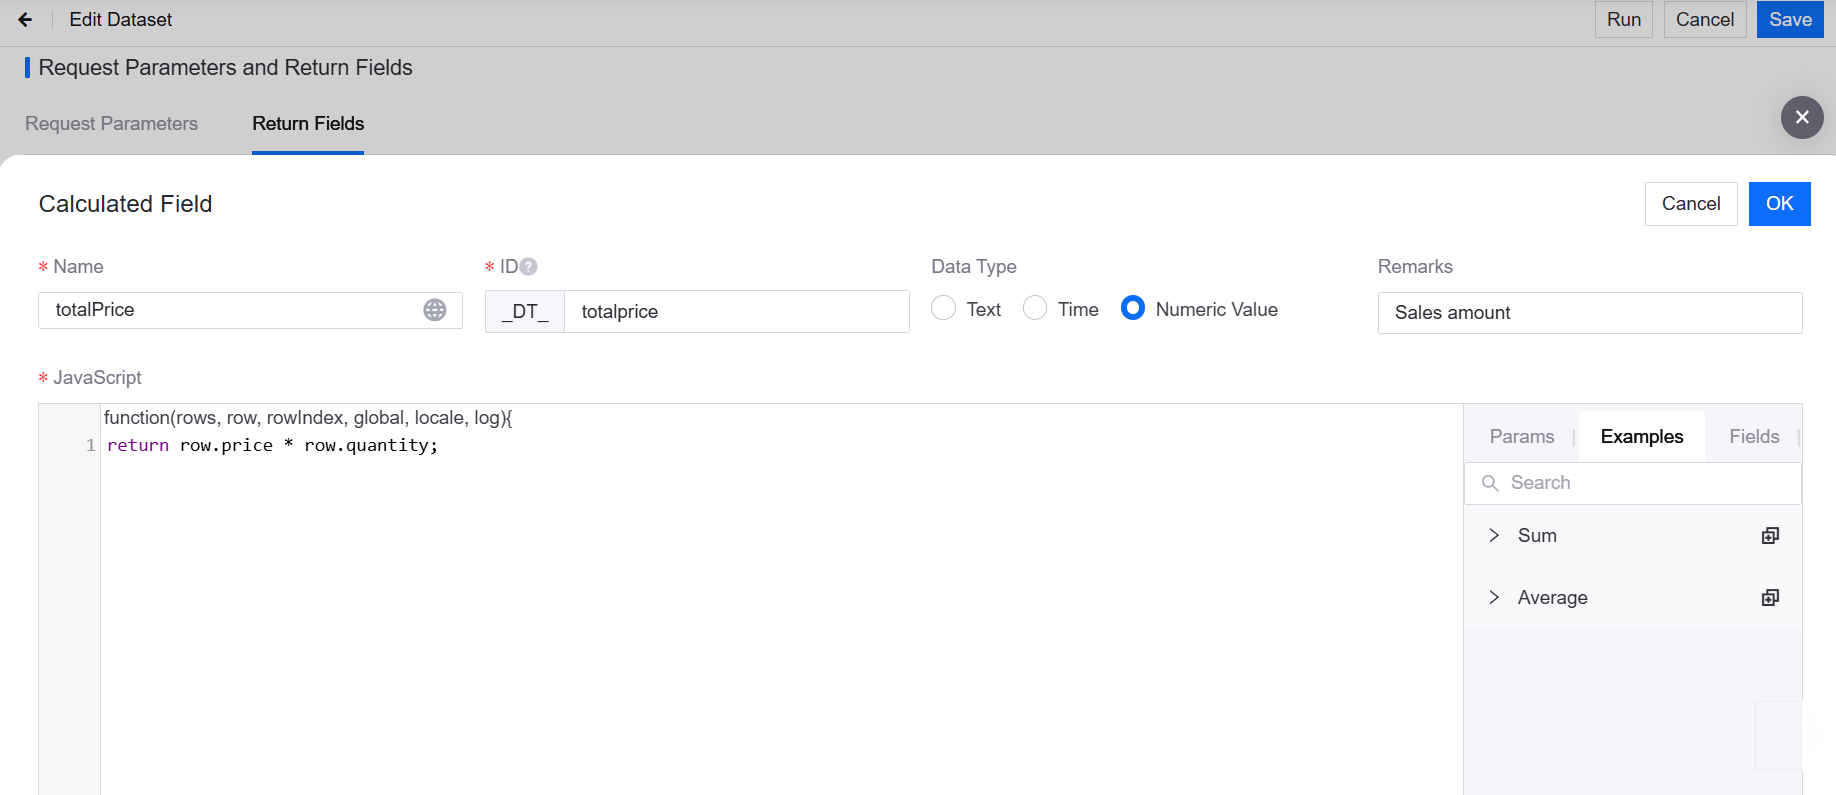
For example, the original fields are price and quantity, and the business requirement is to display the total price on the page. You can add a calculated field totalPrice with the script return row.price * row.quantity, and the widget can directly display totalPrice.
The procedure is as follows:
On the Return Fields tab, select Default Structure in use.
In the Optional Parameters list on the left, all original fields are selected by default. If you do not need some fields, deselect them.
To add a calculated field, select Add Calculated Field, and configure the following content in the pop-up window:
Name: The name of the calculated field displayed in the widget. Internationalization is supported.
ID: The unique identifier of the field. The system will automatically add the
_DT_prefix.Data Type: Declares the data type returned by this field.
Remarks: A description of the field’s purpose, for easy maintenance.
JavaScript: The script that defines how to calculate this field. Press and hold CTRL to reference original fields in the script. The data type returned by the script must be consistent with the declared Data Type.
4. After configuration, select OK in the upper-right corner of the pop-up window. This field will appear in the Optional Parameters list and is selected by default.
Method 2: Customize the Structure
A custom structure is suitable for scenarios where you need to fully customize the returned data format. Unlike the default structure, a custom structure allows you to reorganize the data source fields and define the output structure through a script to meet complex business needs.
For example, the original data contains province, county, price, quantity, and stock, and the business requirement is to display region, totalPrice, and status. You can define the 3 return fields region, totalPrice, and status by writing the following script:
function(data, global, locale, log) {
    return data.map(function(item) {
        return {
            region: item.province + '-' + item.county,
            totalPrice: (item.price || 0) * (item.quantity || 0),
            status: item.stock > 0 ? 'In Stock' : 'Out of Stock'
        };
    });
}
The procedure is as follows:
On the Return Fields tab, select Custom Structure in use.
Select Add Origin Data on the right to declare the original fields that need to be referenced in the script. In the above example, these are
province,county,price,quantity, andstock. The fields to be referenced are listed in the Write script to associate fields list.In the Script area, write a JavaScript script to define the final returned fields and the calculation logic for their values.
In the Return Structure, declare the fields returned by the script. You can select Add Origin Data to reference original fields, or Add Custom Field. The fields returned by the script must have names consistent with the referenced original fields or custom fields, and their data types must be compatible. In the above example, you need to add the custom fields
region,totalPrice, andstatus.
Step 4: Debug and Verify
To ensure that the dataset is configured correctly, you can use the debugging function to simulate a widget request and verify the returned results. The procedure is as follows:
Select Run in the upper-right corner.
In Request Data on the left of the pop-up window, select the return fields to debug.
Continue to configure the values of the request parameters on the left of the pop-up window.
After configuration, select Run.
View the values of the return fields in the Preview tab.
If the returned result is abnormal, you can view the detailed information of the API request and response in the Trace tab to quickly obtain detailed logs.
Step 5: Use the Dataset
After configuration, select Save in the upper-right corner of the page to save the dataset.
Refer to Configuring Widget Data to use the dataset in widgets on dashboard and single-page application pages.
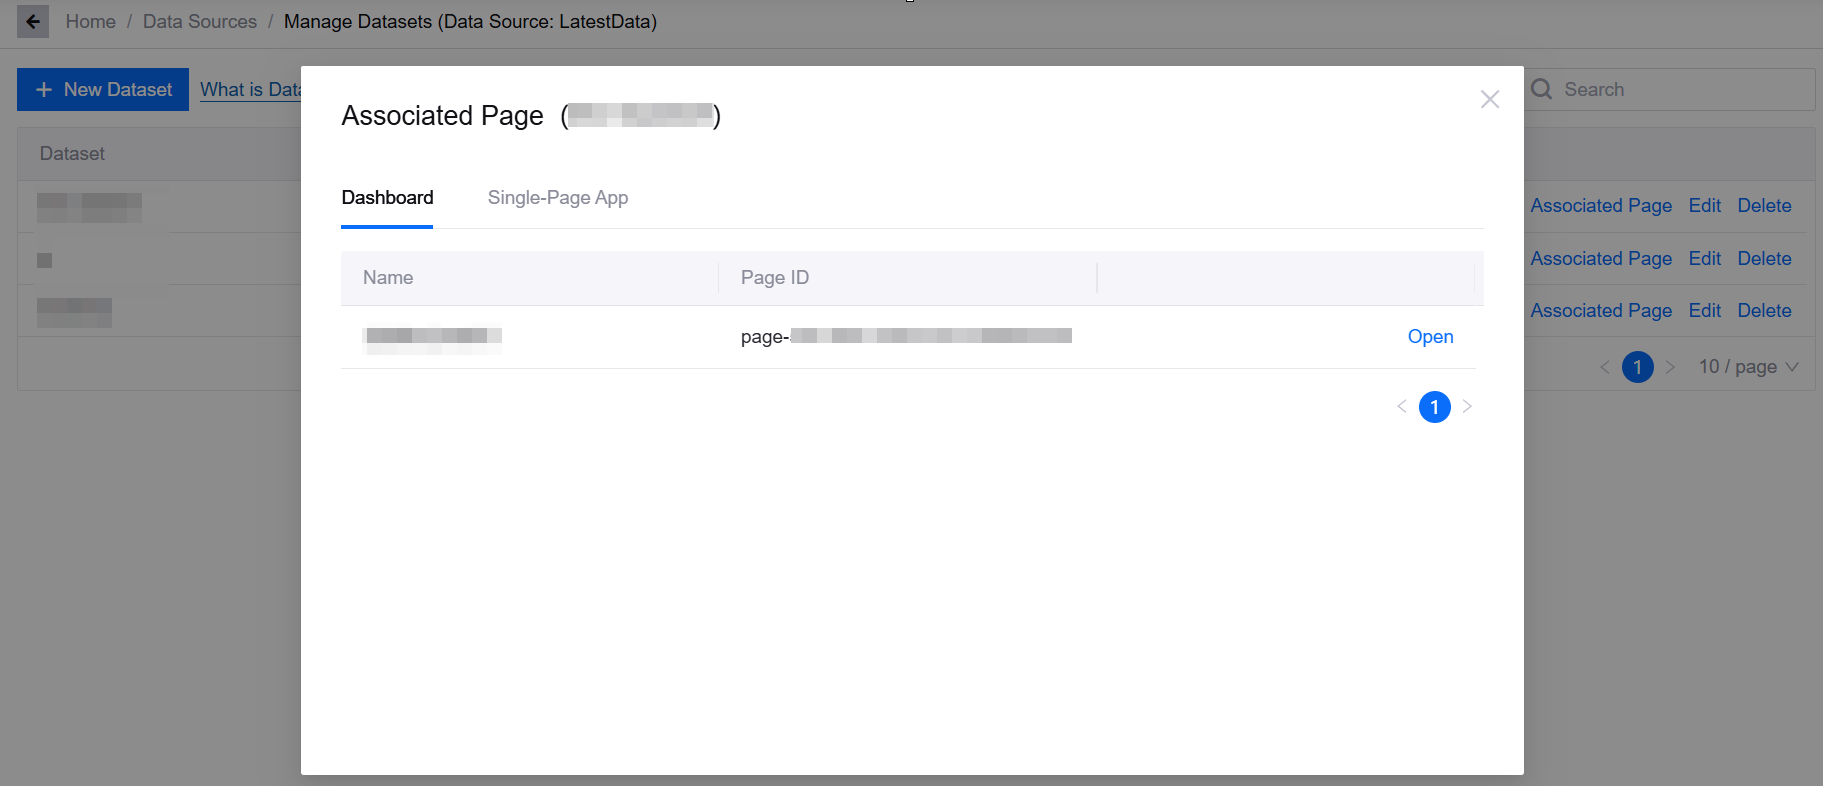
On the dataset configuration page, you can select Associated Pages to view the pages associated with the dataset.
Results
A dataset has been created in the target data source and put into use. If necessary, you can edit or delete the dataset on the dataset configuration page.
Note
If a deleted dataset is already in use, the widgets on the related pages will not be able to obtain data. The system will not automatically replace it with the default data source, and you need to manually reselect the dataset in the widget configuration. It is recommended that you view the Associated Pages before deletion, and perform the deletion after verifying the impact.