Map
Map is the fundamental module for wind farm planning. With a refined map, the accuracy of calculation is distinctly enhanced.
In this section, you are introduced to the following contents:
- Importing a Map
- Creating a Terrain or Roughness Map based on Polygon
- Checking Terrain and Roughness
- Testing Map
- Merging Map
- Exporting Map
Importing a Map
This section is about how to import a map file into the project.
Before importing a map file, confirm you have created a project and the map file from customer or post-assessment team is ready for use.
Click the project name in the project pane. The operation buttons appear at the bottom of the project pane.
Click the Import/Export icon
 to open the Import/Export page.
On the Create page, select the category as Map.
Click the Upload button to open the file selection dialog and select a map file.
Click the open button to import this map file.
Select the projection, zone, and datum from the respective drop-down menu.
Note
Find details of these items in the first line of the map file. They are fixed for each map. If no information is found, contact the provider of you map file.
Input a name for this map in the Object Name field.
Click the Create button. A map object is added in the project pane.
Creating a Terrain or Roughness Map based on Polygon
If no map file is provided by customer or post-assessment team, or the terrain information in the map file is incomplete, you can create a terrain or roughness map file based on the polygon you draw.
Draw a polygon and save it in the project. Refer to the section Drawing a Polygon for details.
Click the project name in the project pane and click the data download icon
 in the toolbar menu. The Data downloadpane opens.
Click the Existing Region radio button.
Select a polygon in the Choose drop down menu.
Select terrain, roughness, topography, road network, or wind resource map from the Type drop-down menu, and select the data source and interval correspondingly.
Download Content Data Source Option Terrain SRTM and Greenwich. The recommended option is Greenwich, which is the map set generated by Greenwich machine learning. Data source and interval of contour line Roughness GlobCover2009 and LandCover. The source of these two options are the public data of institutes. Roughness origin Topography Terrain information is acquired from the SRTM or Greenwich data set, and the roughness information is from GlobCover2009 and LandCover. Data source, interval of contour line, and roughness origin Road newtwork Greenwich road network data library. Road level Wind resource map Greenwich wind resource data library. The upper limit of the exterior rectangle area of the downloaded wind resource map is 2000 km2. Wind resource map (height) Note
Terrain, roughness and topography can be created.
Click the Download button, a map object is created in the project named as Map1. At the same time, the corresponding map file is downloaded in the default download directory of your browser.
The boundary of the polygon is expanded by 6 km as the border of the map.
Click the Add button, a map object is created in the project named as Map1. At the same time, the corresponding map file is displayed in GIS.
The boundary of the polygon is expanded by 6 km as the border of the map.
(Optional) To modify the map name, click the map object in the project pane and click the expand icon 《 to open the operation pane.
Edit the name in the Property pane.
Click OK at the top to save the change.
The operations introduced in this section are applicable for scopes in any shape. To download map, you can select the Drawn Region radio button in the Data download pane, input the longitude, latitude, and radius to define a square scope, and select the content type to be downloaded.
Checking Terrain and Roughness
Before micrositing, ensure the accurate contour and roughness information is embedded into the map, which is vital for the CFD forecast accuracy.
Click the check box before the map object in the project pane. The scope of the map is displayed in GIS.
The Layer Edit label appears at the left top of GIS.
Expand the Layer Edit panel and click the Map tab.
Select the content to be displayed in the Content drop-down menu: Roughness or topography.
The default option is topography.
Note
If no roughness data is embedded in the map file, no Roughness option is displayed in the menu. Import a roughness file according to Importing a Map .
Select Roughness in the Content drop-down menu.
Click the Display button to show the roughness of map in GIS.
Testing Map
The map file might consists of fault data. You should test the map data and correct the error. Or else, the convergence in CFD model calculation will be problematic.
Click the map object in the project pane.
Click the expand icon 《 to open the operation pane.
Click the Operation tab.
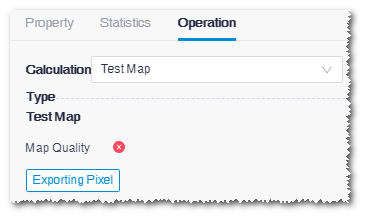
Select Test Map from the Calculation Type drop-down menu.
Click the Test button to check the map quality.
If the quality of the map is good, the √ icon at the right side of Map Quality is highlighted.
If dead pixel exists in map data, a × icon is displayed.

Click the Exporting Pixel button to export the error data into a txt file. This button is only enabled when the map test does not pass.
The default file name is badPoint*<map name>*<datum><projection><zone>, and it is saved in the default download directory of your browser.
Check the map file in Global Mapper, and modify the error data or delete them.
Merging Map
When the scope covered by the map is too limited to know about the terrain, you need to get more key topography knowledge around this map helping you better predict wind speed. The merging map function provided in Greenwich is able to merge the current map with the drawn map or public map library for topography information of larger scope.
Click the map object to be merged in the project pane.
Click the expand icon 《 at the right top of the interface. The operation pane opens.
Click the Operation tab.
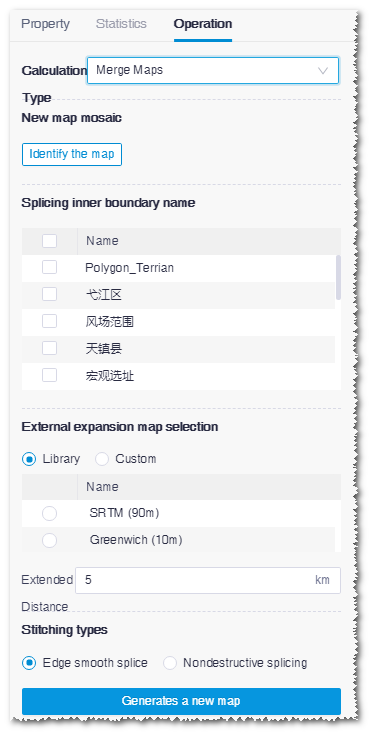
Select Merge Maps in the Operation Type drop-down menu.
Figure: Merge Maps Interface

Click the Identify the map button to identify the contour line of the selected map in GIS. A boundary object is generated in the project tree and it is displayed in the Splicing inner boundary name list.
Select the map(s) for inner-boundary merge in the Splicing inner boundary name list.
All the scopes in the project are listed, and you can select more than one.
Select a map in the External expansion map selection list.
All the maps in the project are listed, and you can select one as the background.
Select the stitching types.
- Edge smooth splice: The boundary of map is processed as smooth by differential treatment. This mode is typically applied on map used in CFD calculation.
- Nondestructive splicing: Map merging is done according to the actual topography and the boundary is rough. This mode is mainly applied in scenarios other than CFD calculation.
Note
Theoretically, whether the inner boundary is within the external map scope, the merging is applicable. However, in practical use, the edge smooth splice requires that the external map completely covers the inner boundary. For nondestructive splicing, the inner boundary is permitted to exceed the external map scope.
Click the Generates a new map button. This task is submitted.
Choose Tools Library > Task List, and select Map Matching in the type list to check the task status.
When the status show Done, click View Results to display the updated map scope after merging in GIS.
Click Download to download the map after merging into the default directory of your browser.
Exporting Map
Click the project name and click the Import/Export icon
 in the operation menu at the bottom of the project pane.
Click the Export tab in the Import/Export page.
Select Map from the Object Type menu.
Select a map object from the Map drop-down menu.
All the map objects in the project are listed in the menu.
Select projection, zone, and datum.
These three fields are automatically filled with the map information. You can modify them if necessary.
Click the Export button to download the map as a file in the map format in the default download directory of your browser.